Let There Be Light Workshop!
- yourjcmphotography

- Mar 4, 2020
- 15 min read
Updated: Jan 27, 2025

What up JCM friends, fam, and followers!? If you’ve been following closely this winter then you probably saw that we were hosting a photography workshop focusing on one of our favorite subjects. Lighting! Off Camera Flash to be specific! Flash in general for a lot of photographers can be an intimidating concept to grasp. Throw in the variable of moving the flash off of the camera and trying to figure out the angle, distance, power, balancing your ambient light settings, how this can all affect white balance, shadow casting, but also keeping in mind that shutter speed can affect your flash differently than aperture, and ISO…..did I just lose you? It’s cool, it’s the reason a lot of people don’t dive deeper into their flash education when it comes to their photography careers. If you haven’t already been doing it for a while, it can seem a bit overwhelming conceptualizing all of these variables and our natural inclination as humans is to avoid the path of most resistance, “Meh, I’m good, I’ll learn that later,” or “I’m doing fine without it why worry about it?” In truth, something I always joke about when discussing this subject is it’s easy to be a natural light photographer in Asheville. I mean on a perfect evening during golden hour with a decent camera body, and 50mm, you could arguably put the camera on auto and do a decent job of figuring it all out in post. So why the push to learn something like Off Camera Flash?
I can think of a ton of reasons but I’m going to spit ball my favs below before summarizing here what this workshop is about and why we encourage photographers to learn flash. At the end of the day, OCF is just another tool. The more tools you have and the more likely you will be able to figure out any problem that is thrown at you on a wedding day or portrait session. With the nature of what we do for a living, there are so many variables like seasons, time of day, personalities, styles, light direction, light quality, color, etc. Having a powerful tool like OCF to be able to use at your discretion allows one to be able to figure out most (if not all) of those above issues and more potential situations you can encounter on a wedding day or portrait session. It also allows you a platform to be more creative with your work!
Differentiate your work - With everyone shooting at roughly the same places, during roughly the same times of year, at roughly the same times of day, it’s one of the easiest ways to make your work stand out from the person next to you.
Variety - It allows you to deliver an entire gallery to your clients that is more dynamic, has more range to terms of color tones, and gives you more ability to capture certain back grounds or highlight specific elements within your image.
Spend less time editing - This is awesome for your clients because they get there images back faster and I know from experience with our couples they LOVE when they get their images back faster than expected. Secondly this frees up a lot of time for you as a photographer, whether you want to put in some extra hiking during the week, spend more time with your family, or you’re like a lo of photographers and you just don’t enjoy the editing process quite as much as shooting. There are many situations where utilizing OCF allows you to process your images with minimal time and effort helping you accomplish all of the above. (I know what some of your are thinking “But you have to spend time setting it up on location so you’re really not saving time.” To that I say “Ha, get real!”) In the time (1 minute or less) it takes me to set up a flash and dial in my settings, it if it saves me 30 seconds to a minute per images editing, then within 2 images I’ve already broken even. Trust me when I say it will change your work flow - - how do you think we’re able to serve so many couples throughout the year?
Color Correction - This point lends itself to the last paragraph, but as a photographer you know how painstakingly simple yet, challenging the process of color correction can be sometimes. Especially on one of the those sunny days in June with out a cloud in the sky and you have to do bridal party portraits at 3pm and you luckily found some shade, but the green color casting is coming in like a laser beam. Utilizing OCF helps you negate this effect and corrects your color in camera. No more green brides, yaaaay!
Embrace the back light - I’m not talking about that perfect amount of soft back light that comes with golden hour portraits, I’m talking about the no clouds in the sky directly behind your bride and groom and in the exact spot they want to capture their family photos. With the right amount of flash power shooting in a backlit situation can be come manageable and in sometimes ideal. No longer does it have to be well exposed subjects with hazy edges and washed out colors. Or a well exposed background and under exposed subject. Why not have the best of both of those options? Even better, why not capture images in all three of those lighting scenarios to be able to give your clients more variety? I know some of you may be thinking “But Joe, with he dynamic range of pro grade camera nowadays, I can just underexpose and lift the shadows in post.” For one, when you lift the shadows 100%, it shows, and though it may be an acceptable image, we’re talking about creating something that looks great, possibly spectacular vs something that looks acceptable. There is a noticeable quality difference and it’s not always something your clients or perspective clients may be able to put their fingers on, but trust us when we say, they’ll know it when they see it.
Problem Solving - Let’s face it, much of what we do on a wedding day besides creating and composing is problem solving. We’re always figuring out the best angle, the best composition, trying to anticipate timing, working with a timeline that may not be ideal, managing different personalities, and last but definitely not list, figuring out your lighting situation. By developing a solid foundation in OCF, rarely will there be a situation you run into that stumps you. Suddenly all of the situations you used to avoid now lend themselves to a new realm of creative possibilities, further developing your skills, confidence, and helping you deliver a more polished and complete album to your clients, no matter what the situation.
Creative Shots - It allows you as a photographer to capture that colorful sky for a sunset shot, or make your subject pop from an otherwise dull background. Or you can incorporate your couples favorite colors into a backlit shot or fun silhouette. The possibilities are nearly endless and the flash photography community is constantly pushing the envelope.
Create more polished images - Even though you can get super creative and dramatic with flash, no all of your shots have to be that and you won’t necessarily want to make them all that way. One of our favorite reasons for using OCF during our wedding days and portrait sessions is just for subtle refinements like getting rid of raccoon eyes in real time vs having to brush them out in post and hope it doesn’t look too noticeable. Or overcoming spotty light when you’re shooting in less than ideal conditions. These little subtleties can go a long way towards flattering your subject and scene and sometimes done right, it’s not always obvious that flash was even used upon first glance.
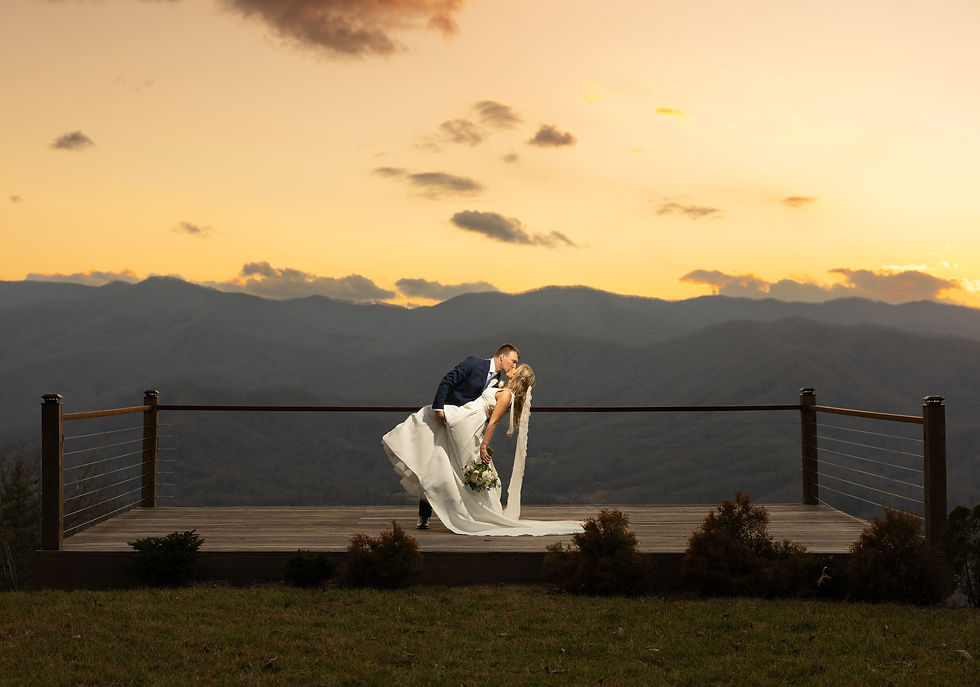
None of this is a knock on any style of photography, even we utilize natural light probably 80-90% of the time. Whether you’re on the light and airy side, dark and moody side, or just somewhere in the middle trying to hone in on your own look, off camera flash is something that can help you tremendously when natural light just won’t do the trick, or won’t do it well. Below we’re going to cover some of the scenarios we covered in our Let There Be Light Workshop, give some of those visual examples from the workshop, and other examples demonstrating some of these concepts in real time (actual sessions and wedding days). Also, truth be told we were hoping for some rough lighting on the day of our workshop so we could demonstrate many of the situations we’ll talk about in this blog, but as irony would have it, we had what most would consider perfect lighting for the day of making showing things like spotty light, and harsh backlight a challenge (maybe we’ll get more of that luck on actual wedding days this year…am I right?!). All of the images will be accompanied by a general explanation. (Our cover image was from an engagement session taken a few minutes after the sun went down and the color enriched the sky. It was a single flash, camera right modified with a diffuser and grid)
The above image comparison is a great example of comparing natural light to flash and creating a more subtle polished look vs the more dramatic look like our cover image and some to follow. This is actually one of our favorite techniques using OCF. Notice the image on the right that used OCF, how the couples pops a bit more from the background. Again, very subtle but something can make a huge difference in the overall quality of your images or even just providing your clients some variety. There's nothing wrong with the image on the left, it's just two different options given the same lighting situation.
The images above are from the same engagement session as our cover image (Thanks Seth and Carolyn!). Instead of being subtle and polished, we went a bit more dramatic in this example comparing natural light and use of OCF. The above images were taken with 2 minutes of each other at roughly the same spot (two different lenses incase you were wondering about compression). Again, nothing wrong with the image on the left vs the image on the right. Just providing our clients with two different looks during the course of the same session for variety. We also used a warming gel to help bring out a bit more blue in the sky for the image on the right.
For the images above in the slideshow we show a quick demonstration of the difference between regular flash, a warming gel, and finally our favorite, a cooling gel. If you're trying to bring out a little more color in your image, color gels can be a great tool to help enhance certain colors in your image. They can also help correct in certain lighting situations or match the ambient light to have an evenly lit/colored image. Remember, your flash is typically going to be around 5500-5600 kelvin in it's color temperature so if your ambient color is a lot different than that, it could look a little funky in your final image. It's something that can be edited but color gels can save you a ton of time if needed for the look you're trying to achieve.

The above image is an unedited example of a table detail shot taken ambient light only (no flash) in auto white balance with a relatively correct exposure. Clearly not acceptable by any stretch of the imagination.

This is the edited version that has been color corrected (relative to our style) and while this version would be acceptable it still has it's flaws like very noticeable color casting in certain area of the tablecloth and chairs.

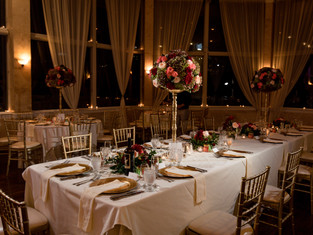
The above is a table-scape detail shot taken with OCF. This one modified with grid and diffusers. Notice how much more detail you're able to get out of this image. In addition we've also preserved the mood of this venue (Inn at Tranquility Farm) by not brightening it up to the point that we've taken away all of that warm rich ambience. (Below is another comparison of natural light vs OCF)
The above example is another dark indoor venue (Homewood) and while the color casting isn't as pronounced it's still a good side by side comparison to see the difference in rich color and contrast. Nothing wrong with either image, just personal preference on the overall look of what you would like to deliver to your clients. But what if you're in a situation where your venue as almost no ambient light? See below!
Aaron and Alain's venue had almost no useful available light for the purposes of lighting u the table so even if we wanted to we could not have effectively used natural light. Had we try to use bounce flash the white/white-ish walls and ceilings would've completely reflected away all of the mood and color from this cool downtown venue. With the use of OCF and modifying with gridded diffusers to reduce spill, we're able to place the light where it's needed and still keep the ambience of their beautiful venue.
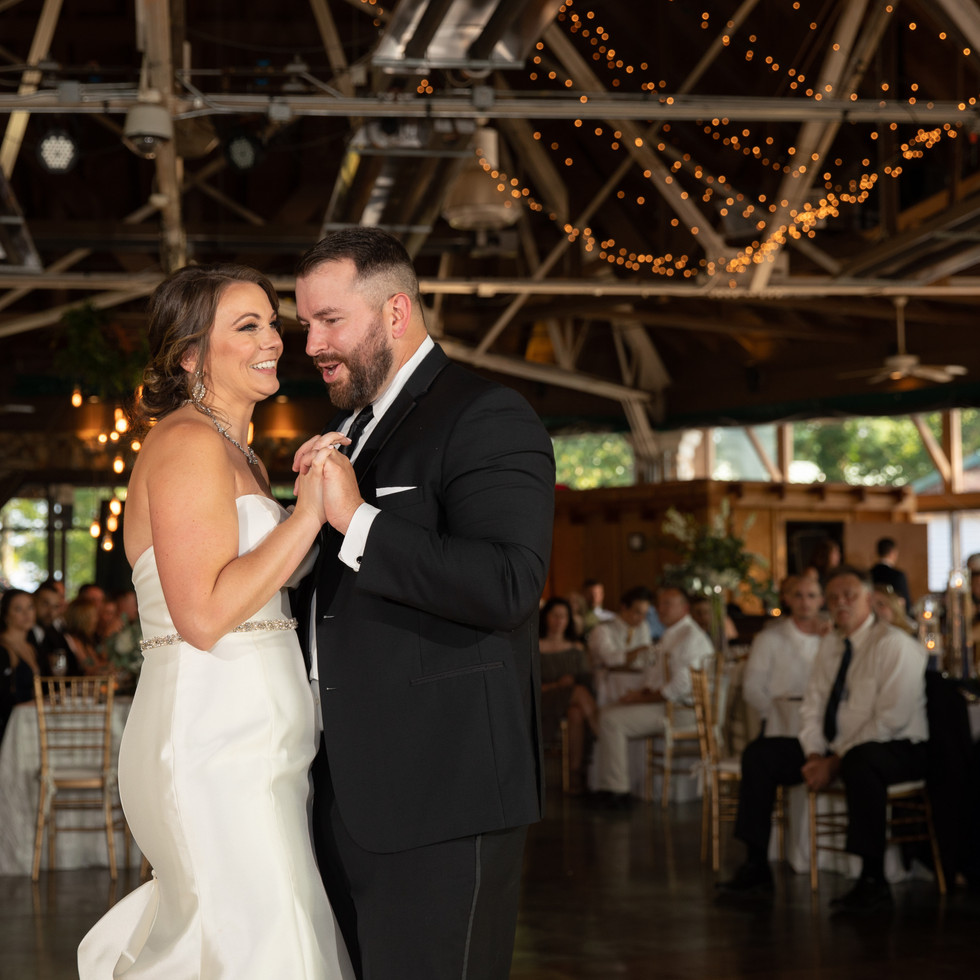
What about a venue with a decent amount of available light? In the above first dance we show a good comparison between natural light (images 1 and 3) and OCF (images 2 and 4). This is one of those situations where sometimes one of us will go natural light the entire time and one of us will utilize flash to provide our clients with two different looks. Notice the shadows and a bit more contrast from the natural light images, and a bit more of a polished look for the flash images.
So we've seen dark venues, we've seen darker, venues, and we've seen some reception venues with a little bit of light to work with but what about ballrooms? Ballrooms can be a bit more of a challenge because you're not wanting to create too much light spill in order to preserve the mood of the venue and the colors that the couple has chosen for their big day. Usually they are dressed with uplighting and the ceilings are high.


In the above set of images from Matt and Nicole's wedding, we had to tighten up our light spread by using grids and focus the light exactly where we wanted it in order to preserve the color and mood of their reception space. Often times (like above) the use of OCF will be directional so there is likely going to be a little spill, reflection, or shadow cast somewhere. In these cases we'll try to be mindful of where we point our lights and where we angle the shot as seen with the shot of Nicole's dad giving the speech. Once we changed our angle in the 4th image, you can see where the light hitting him spilled. From the 3rd image actually focused on him, we're able to conceal that within the image.
In the above images we show our two most common dance floor set ups for first dances. The first image we have two lights camera left and right pointed in about 45 degrees with diffusers to modify. For the second image we take a cross light approach putting the one light camera left and right, but moving the right off camera flash to the opposite side of the dance floor so the lights are essentially pointing at each other if you looked from behind them. We like both approaches for different reasons but overall we love the coverage you get from the first option and we like the ability to create a more contrasty image as well as grab some nice rim light with the second option.

The above technique is one of our favorites for day like we had on the workshop! As we previously said, the light was great but in terms of tone, it was a little cool and edged towards gray. If your couple loves that feel of golden hour or backlight, but the weather just isn't cooperating for that kind of scene, create your own golden hour by adding a warming gel to a flash and edge that light ever so slightly into the frame until you get it just right. You can also aim back at the lens to create lens flares that look like they were caused by the sun. This technique works best in our experience when you use a more wide open aperture. The slideshow above shows the difference in warmth and overall mood from just natural light by edging the light into the frame. The image below the slideshow is an example of aiming back at your lens. Like all thing, the more you practice this technique, the easier it will get to dial it in quick. Don't feel rushed, communicate with your clients that you are setting up a creative shot, and give yourself a little time to execute, most of all, don't be afraid to make adjustments.
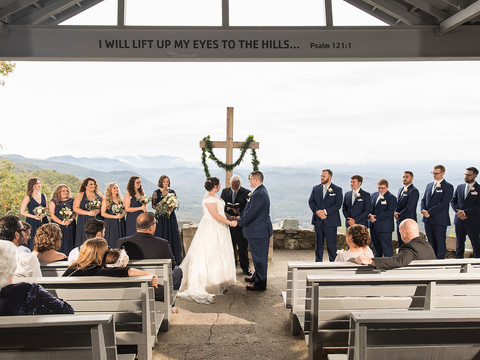
Ahh! The dreaded backlit/covered ceremony! Above is a side by side comparison of the difference adding a touch of light can make. The settings are exactly the same and the edits are roughly the same, the only difference, is the one of the left is the last shot in the sequence when our flash needed a second too recycle. There's nothing inherently wrong with the image on the left, and one could argue that stylistically we could lift the shadows even more, though we hate that look created in the shadows and black of an image when you lift the shadows too high (but I digress). If you lifted the overall exposure, you could get it roughly to a place that looks good for your subjects but you're definitely losing all the detail and texture if the background. Now some of you may be saying yeah but you could potentially bring the highlight down. If this is where your mind is going, it sounds like you've done it before, and we've experimented with those kind of edits with a lot of dynamic range needing to be covered to get the image to a place where it's exposed well and the difference between lifting your exposure a lot, raising your shadows to the max, and dropping your highlights all the way down, let's face, it just looks wonky and over edited when compared to the polished and clean look of an image using OCF to do most if not all of the aforementioned in camera.


Speaking of backlight, doesn't it always seem like every venue you go to, they put the details that you need to shoot in a bright window? Par for the course, and it's something we used to struggle with before we learned OCF. Even in a venue that happens to have white ceilings for bounce flash on camera, you're generally not going to get enough concentrated light on the subject to balance out the exposure without either A) underexposing whatever you're shooting, B) blowing out the background, or C) ending up at some middle ground where neither the highlights or shadows look that good. In the above images we were faced with that exact scenario (and we've all been there) so we dialed in the ambient first, dialed in our flash power second and were able to capture this couples wedding details that were backlit without losing the background. In each of the images above, two off camera flashes were used camera left and right pointed in about 45 degrees in and slightly down to get enough power to light the details. Each light was also equipped with a diffuser.
Lighting for the reception in dark reception venues like The Inn at Tranquility Farm can also benefit from the use OCF. In each of the above images from Sam and Allison's wedding we were using two flashes modified with grids, diffusers, and warming gels. Now, putting a lot of these things in front of your light can kill your power so adjust accordingly with regards to your flash power or flash distance to subject. We like this approach for certain reception set ups because it allows us to put our flashes where we need to to light the couple and the speakers but we are able to stand further back and be less obtrusive. We could just as easily go on camera flash and point it right at them but 1) the look created is not nearly as flattering, and 2) this puts you in a position (literally) where you're going to have to get in close on the action and likely block many from viewing the couple and speaker.


The two images above help us demonstrate one of our favorite simple techniques for using one OCF. Place a single light behind your couple to backlight them. That's it. In certain situations and compositions this technique can add a little bit more interest to your image by drawing someone's eye where you want it to go, in this case, right on our couple! For the above images, we processed them the exact same way but the only difference was adding a single flash with a warming gel behind our couple and voila! This is also a great technique to utilize when the background is completely black as it will help separate your couple from the background and give them a little more pop and dimension.
Now at this point you may be saying "OMG my brain can't take any more," and that's okay! We've covered everything that we wanted to cover that we believe highlights many of the benefits of using OCF! Whether you're using it to create a dramatic sunset for your portraits or just using it to balance out an exposure, it's a powerful tool that can be used in so many ways by so many different styles! We hope that if you were in attendance at the Let There Be Light Workshop in person you were able to pick up on a lot of those concepts and for those just reading this blog, we hope this can help shed some light on this subject as well! We're stoked that you find value in what we do and in turn want to create some of that in the same way for you! We're going to finish out this blog with a few more of our favorite OCF shots mixed in to get your creative minds thinking! Remember, if you're looking to learn more about Off Camera Flash or other subjects related to your photography education and business, we offer one on one coaching sessions as well to help get you to that next level! Thank you all for following along and a special thank you to our host venue Inn at Tranquility Farm, Michelle from Party Envy Event Planning and Florals, as well as our models Jesse and Megan!

(Above image no flash; The image below taken seconds later with OCF)


(Above image, natural light; The image below taken moments later using OCF)


Remember it doesn't always have to be dark and dramatic, in the above image, OCF helped us preserve these ladies beautiful skin tones without being turned green by harsh mid day sun color casting the grass.

Of course there's always the option to add a little drama and create something epic!


Jenny & Joe













Comments